How to set DataContext in Avalonia UI user control (Windows / Android demo included)
Published:
Modified:
Introduction
Data context (DataContext) is an important part of Avalonia UI data binding mechanism. It represents the default binding source object.
For instance, if we define binding as {Binding Name}, we are actually referencing the Name property of an associated DataContext object.
Before continuing, you might want to read a related post – How to bind to direct properties of a user control within the user control itself.
Data Context Hierarchy
For each control, there is hierarchy of data context objects, which correlates to control hierarchy (XAML object tree).
Data binding mechanism first evaluates data context object of the control which hosts the binding. If data context is not set for the control then parent’s data context is used. If parent’s data context is not set, data binding mechanism goes up the tree. This is done until data context object is found.
User Control Data Context
When we create a custom user control, by default its data context is not set. As explained above, we fall back to a data context object higher in the hierarchy/tree, i.e. data context is inherited. Most of the time, this is not what we want. What we really want is to set DataContext to the user control itself.
As an example, suppose we have a Name property defined in our control’s code behind. If we do not set the control’s data context to the control itself, then {Binding Name} will not reference the control’s Name property. Instead, it will reference the Name property of a data context object somewhere in the hierarchy/tree. Of course, the final data context object may or may not contain Name property. Whatever happens, we probably end up with a subtle bug, or compiled binding error.
Demo Project
The complete source code is available on GitHub (Avalonia user control DataContext). Make sure to download it and open with Visual Studio – it’s the best way to learn!
The demo showcases:
- How to create custom user control in Avalonia UI
- How to define
DirectPropertyin user control’s code behind - How to set data context in user control’s XAML (design time)
- How to set data context in user control’s code behind (runtime)
User Control – DirectProperty
We will create two user controls – XAMLDataContextUserControl and RuntimeDataContextUserControl. For simplicity, both of them will have only the Greeting DirectProperty and property definitions will be identical.
public static readonly DirectProperty<RuntimeDataContextUserControl, string> GreetingProperty = AvaloniaProperty.RegisterDirect<RuntimeDataContextUserControl, string>(nameof(Greeting), o => o.Greeting, (o, v) => o.Greeting = v);

private string greeting;
public string Greeting
{
	get => greeting;
	set => SetAndRaise(GreetingProperty, ref greeting, value);
}
How to set DataContext in XAML (design time)
When setting DataContext in XAML, we need to define user control’s name. We do this by x:Name="DataContextUserControl1".
<UserControl xmlns="https://github.com/avaloniaui"
             xmlns:x="http://schemas.microsoft.com/winfx/2006/xaml"
             xmlns:d="http://schemas.microsoft.com/expression/blend/2008"
             xmlns:mc="http://schemas.openxmlformats.org/markup-compatibility/2006"
             mc:Ignorable="d" d:DesignWidth="800" d:DesignHeight="450"
             x:Class="Monsalma_AvaloniaUserControlDataContext.Controls.XAMLDataContextUserControl"
			 x:Name="DataContextUserControl1">
Then, when defining our top level control (in our case StackPanel), we simply need to define its data context: DataContext="{Binding #DataContextUserControl1}". All child controls inherit data context by default. That’s why, further down in the code snippet, we have: Text="{Binding Greeting}". It is as simple as this.
<StackPanel
	DataContext="{Binding #DataContextUserControl1}">

	<Border
		BorderBrush="Gray"
		BorderThickness="1"
		Padding="5"
		Margin="10">

		<StackPanel>
			<TextBlock
				FontStyle="Italic"
				Text="Data context set in XAML" />

			<TextBlock
				Text="{Binding Greeting}" />
		</StackPanel>
	</Border>
</StackPanel>
Here it is important to mention that we have enabled compiled bindings. Using this approach (setting data context in XAML), we get simplicity (we use the simplest binding expression), transparency (we can easily understand what our data context is) and performance (compiled bindings).
How to set DataContext in code behind (runtime)
When setting data context in code behind, we don’t need to specify user control’s name, and we don’t need to specify top control’s data context. We still get to use the simplest binding expression ({Binding Greeting}) and we still get to enjoy benefits of compiled bindings, although it’s not easily understandable what our data context is.
<UserControl xmlns="https://github.com/avaloniaui"
             xmlns:x="http://schemas.microsoft.com/winfx/2006/xaml"
             xmlns:d="http://schemas.microsoft.com/expression/blend/2008"
             xmlns:mc="http://schemas.openxmlformats.org/markup-compatibility/2006"
             mc:Ignorable="d" d:DesignWidth="800" d:DesignHeight="450"
             x:Class="Monsalma_AvaloniaUserControlDataContext.Controls.RuntimeDataContextUserControl">

	<StackPanel>

		<Border
			BorderBrush="Gray"
			BorderThickness="1"
			Padding="5"
			Margin="10">

			<StackPanel>
				<TextBlock
					FontStyle="Italic"
					Text="Data context set in runtime" />

				<TextBlock
					x:CompileBindings="False"
					Text="{Binding Greeting}" />
			</StackPanel>
		</Border>
	</StackPanel>
</UserControl>
Setting data context in user control’s code behind is super simple. We can do it in the constructor with DataContext = this:
public RuntimeDataContextUserControl()
{
	InitializeComponent();

	DataContext = this;
}
Demo Project
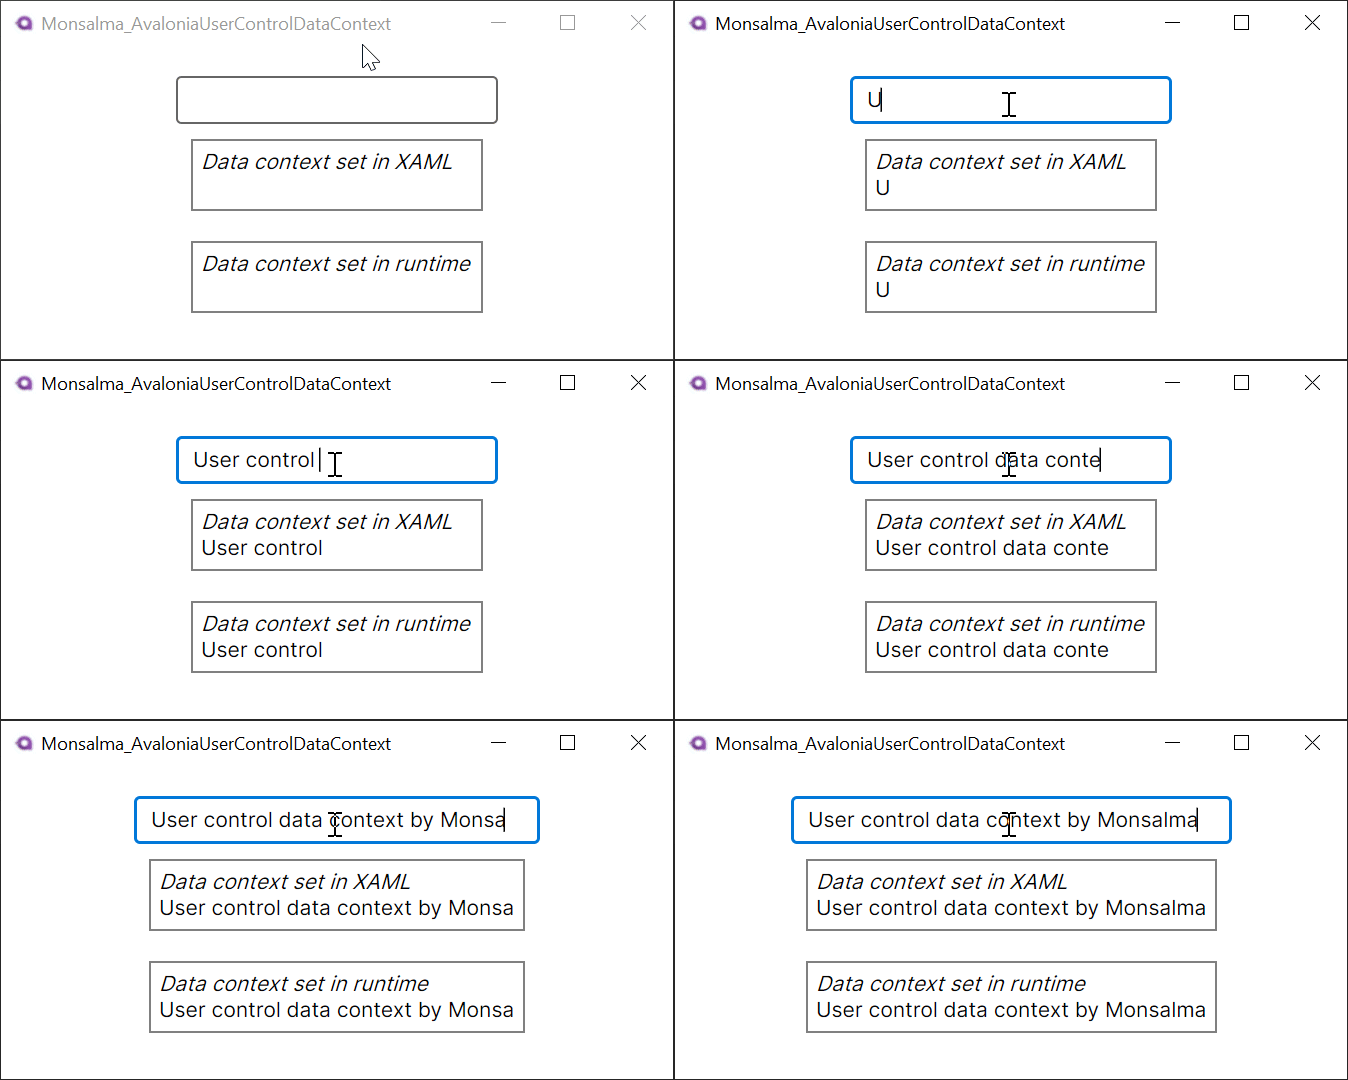
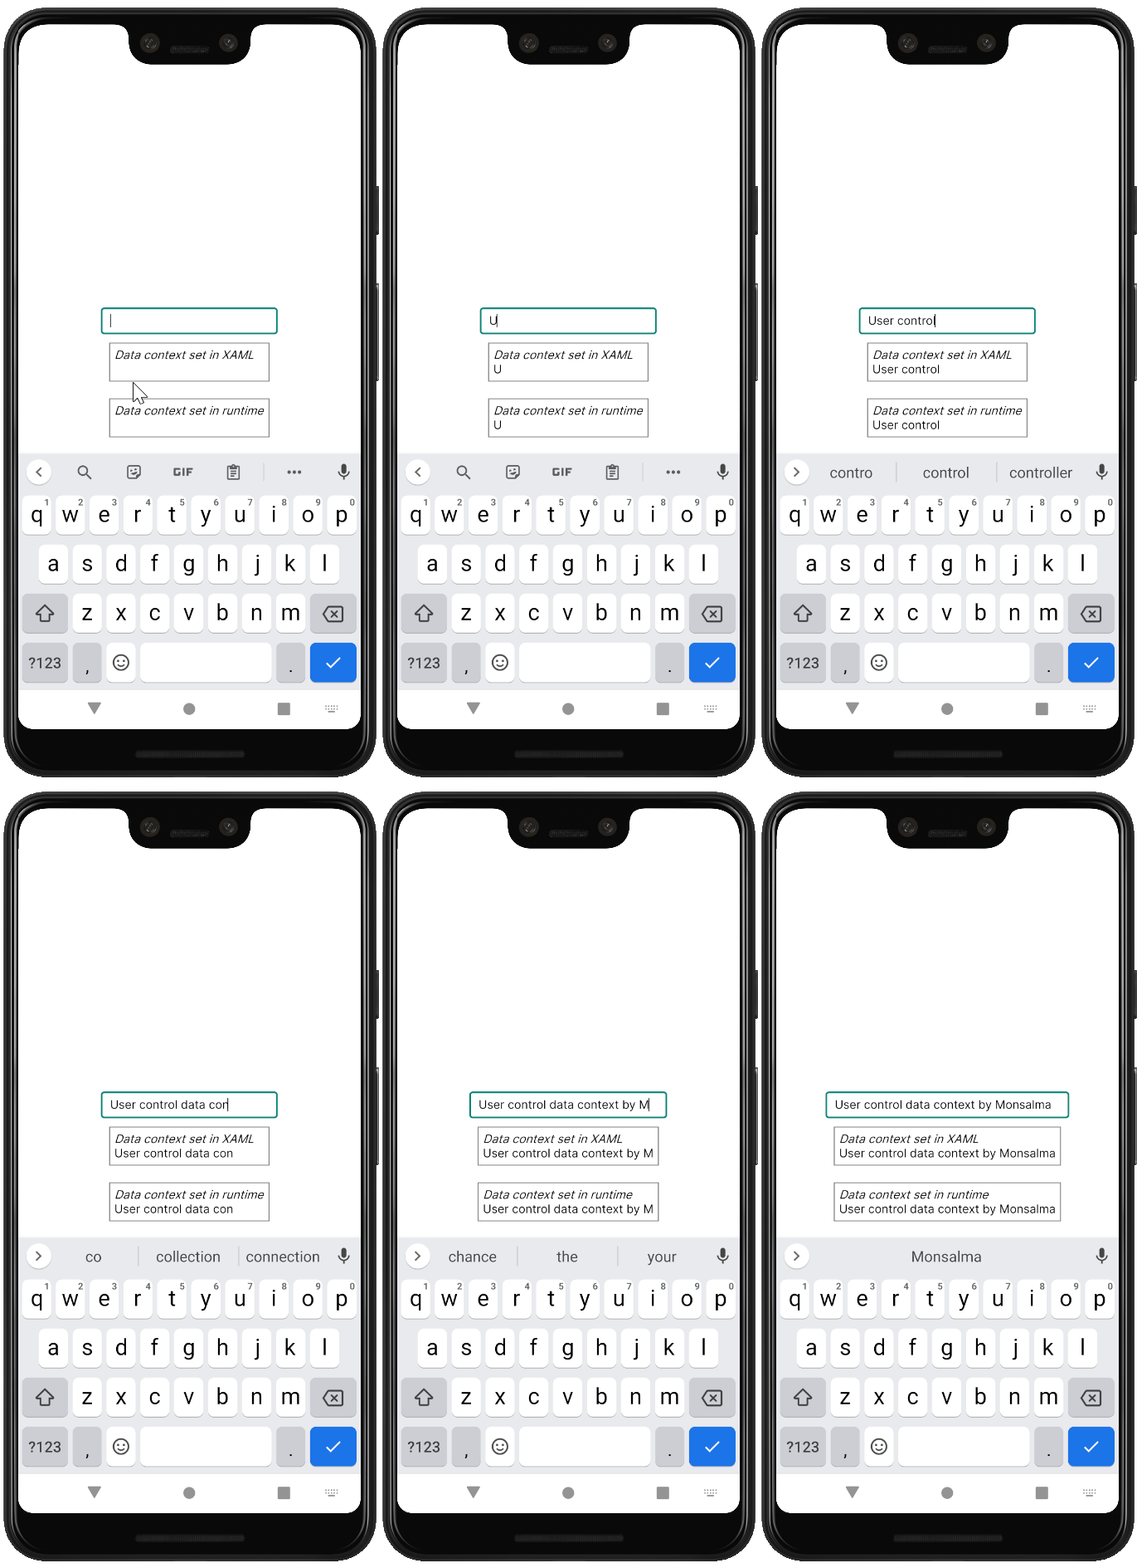
We went through some theory and relevant portions of the source code. Now it’s time to see our demo in action.
Windows Desktop

Android Emulator – Google Pixel 3 XL (API 30)

Summary
Setting DataContext in custom user controls typically is a must. We can do it both in XAML and code behind and we still get to enjoy all benefits of data binding.
I would suggest setting data context in XAML by default, and using code behind in advanced scenarios.

Leave a Reply