How to play URI based audio in Avalonia UI using LibVLCSharp library
Published:
Modified:
- 1 Introduction
- 2 The Goal
-
3
Step by Step Walk-through
- 3.1 Step 1 – Create the project
- 3.2 Step 2 – Select project type
- 3.3 Step 3 – Configure the project (project name and location)
- 3.4 Step 4 – Avalonia project configuration 1/3 – Target platforms
- 3.5 Step 5 – Avalonia project configuration 2/3 – Design pattern
- 3.6 Step 6 – Avalonia project configuration 3/3 – Features
- 3.7 Step 7 – Modify C# nullable context
- 3.8 Step 8 – Modify the default Avalonia UI greeting
- 3.9 Step 9 – Change main window size
- 3.10 Step 10 – Run the app
- 3.11 Step 11 – Install LibVLCSharp package
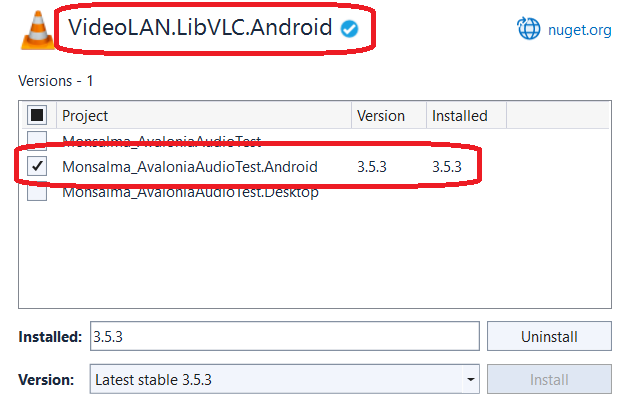
- 3.12 Step 12 – Install VideoLAN.LibVLC.Android package
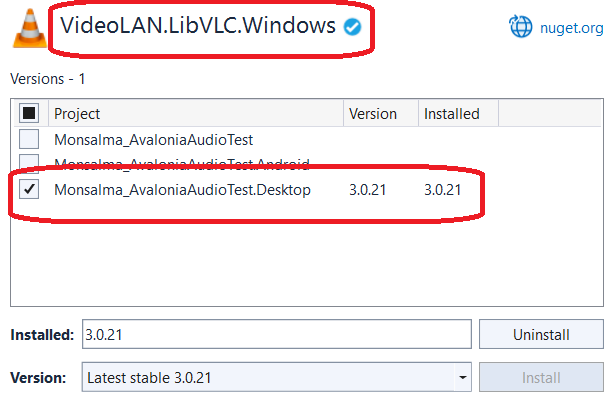
- 3.13 Step 13 – Install VideoLAN.LibVLC.Windows package
- 3.14 Step 14 – The source code (code behind)
- 3.15 Step 15 – The source code (XAML)
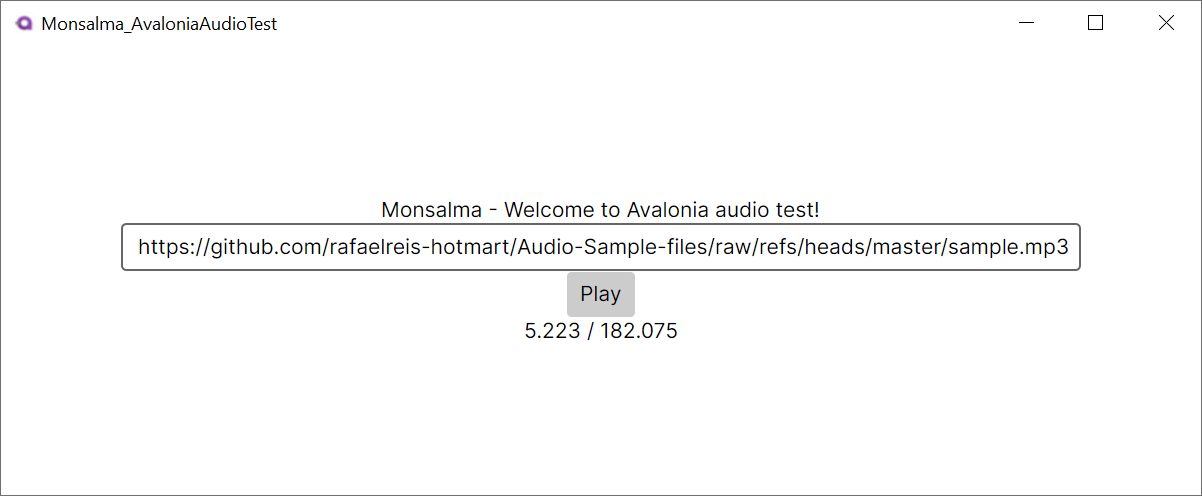
- 3.16 Step 16 – Run the app on Windows
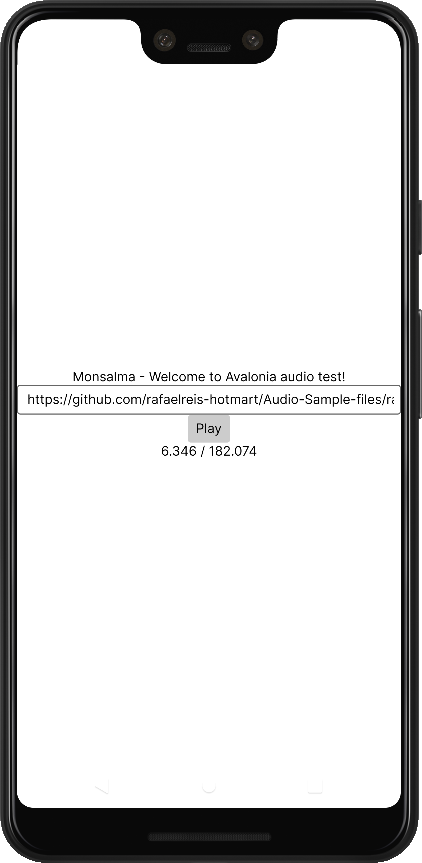
- 3.17 Step 17 – Run the app on Android
- 4 Conclusion
Introduction
Welcome to the Avalonia UI audio playback demo! We’ll be using Avalonia UI and LibVLCSharp library to play an audio file.
The complete source code is available within Monsalma Avalonia UI GitHub repository.
Avalonia is an open source framework for building beautiful, cross-platform applications from a single .NET codebase. To get familiar with the platform, please navigate to the official Avalonia UI website, documentation and GitHub page.
LibVLCSharp is a cross-platform audio and video API for .NET platforms based on VideoLAN’s LibVLC Library. To get a basic idea of the library, please check out the LibVLCSharp NuGet package and browse the official LibVLCSharp documentation. If you want to go straight to the official code samples, continue your research at the LibVLCSharp “How Do I do X” page.
The Goal
This demo is about:
- Using Visual Studio 2022 to create Avalonia C# project. The project will target Windows and Android and will use the Community Toolkit design pattern.
- Installing LibVLCSharp NuGet package and platform related NuGet packages – VideoLAN.LibVLC.Windows for Windows platform and VideoLAN.LibVLC.Android for Android platform
- Writing the minimal code to play an URI based audio file and display current playback position and total media duration
This demo is NOT about:
- Model-View-ViewModel (MVVM) design. The demo intentionally uses code behind to perform all the work. It almost completely avoids the view model.
- User interface (UI) design. We will use minimal XAML code to play audio (TextBox for entering URI, Button to start the playback and TextBlock to display current playback position and total media duration). We will not have the pause button, stop button, jump backward/forward button or similar.
- Exception handling
- Disposing objects
- Asynchronous method invocation
- Advanced LibVLCSharp features
Step by Step Walk-through
Now I’ll walk you through the process of creating the demo project from scratch.
Step 1 – Create the project
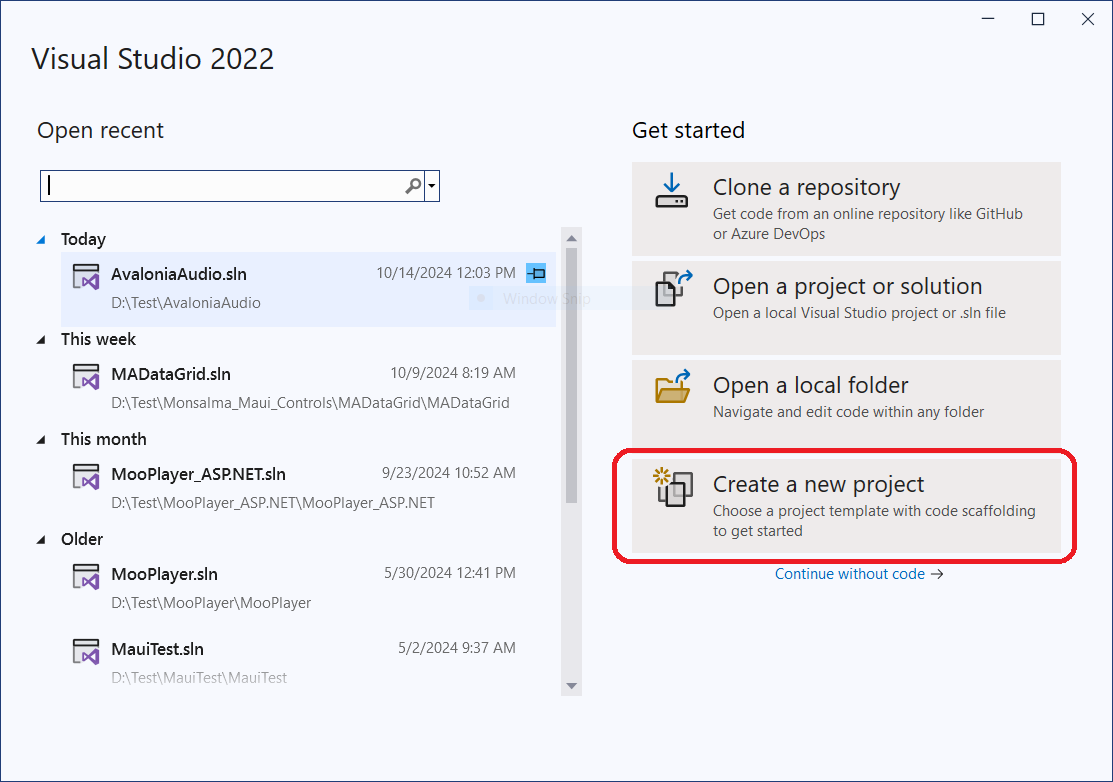
Launch Visual Studio 2022 and hit the “Create a new project” button:
Step 2 – Select project type
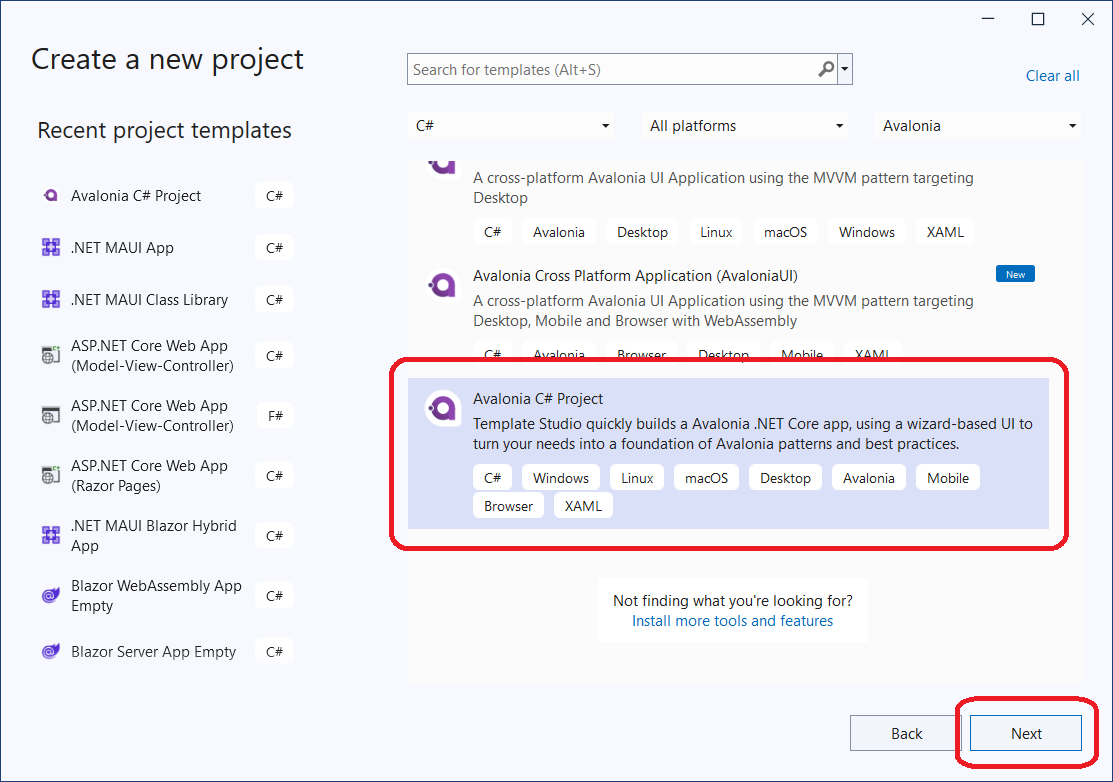
Let’s select “Avalonia C# project” and hit Next:
Step 3 – Configure the project (project name and location)
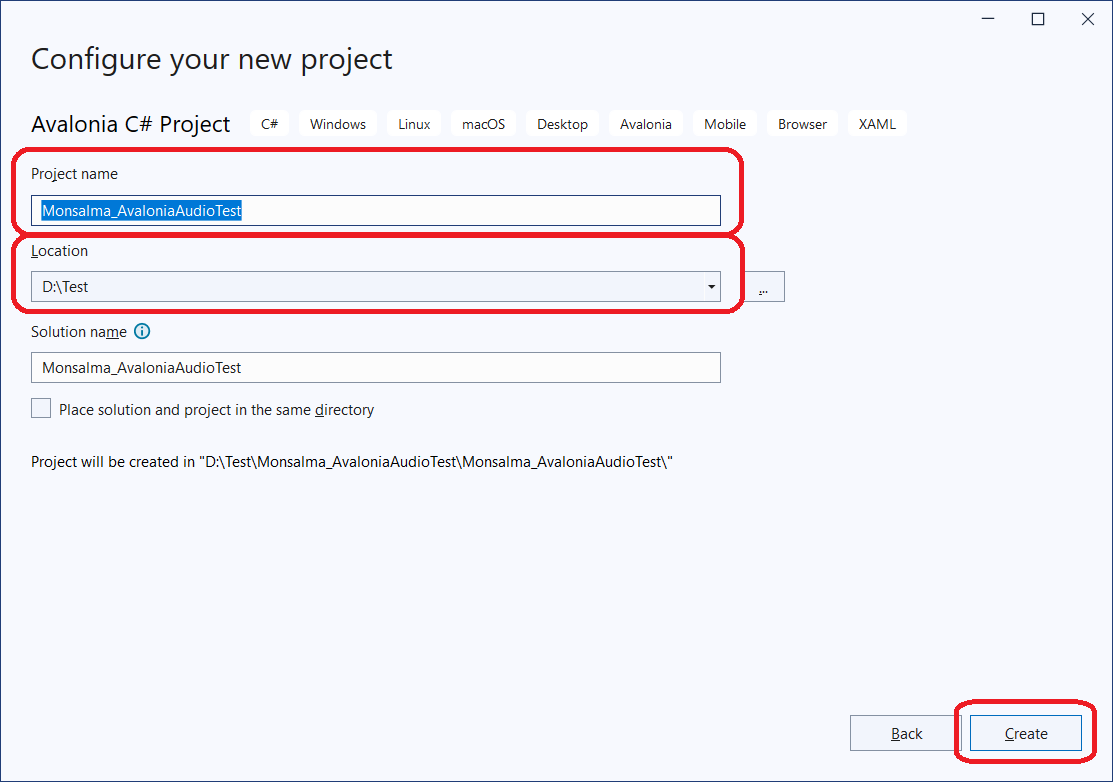
Enter the name you like, enter location or browse to the location and hit Create:
Step 4 – Avalonia project configuration 1/3 – Target platforms
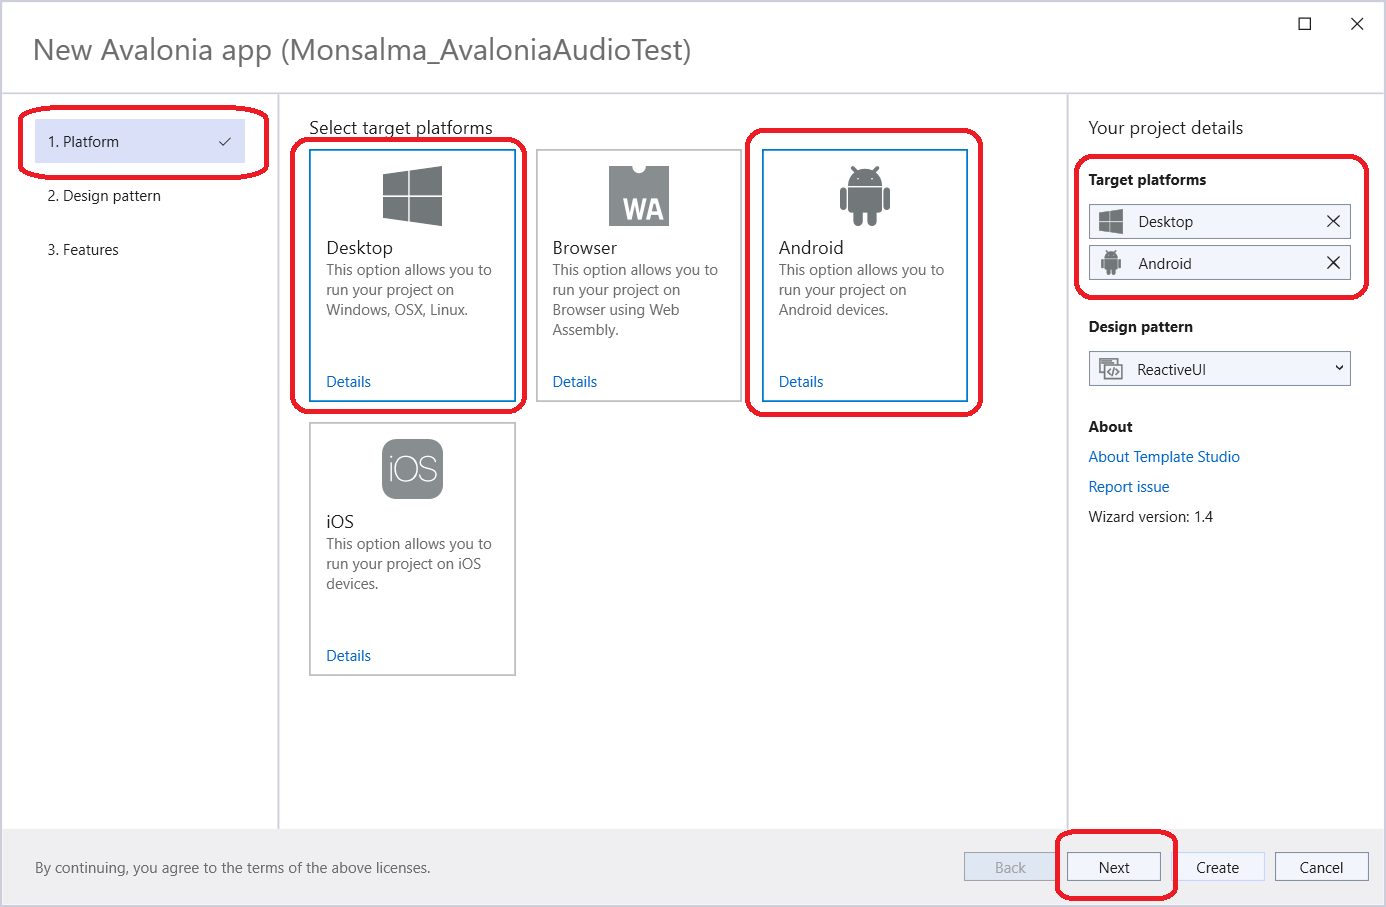
Now it’s time to start configuring Avalonia UI related stuff. First we need to select target platforms. For this demo I used only Windows Desktop and Android, but feel free to play around with other platforms. Hit the Next button after you’re done selecting target platforms:
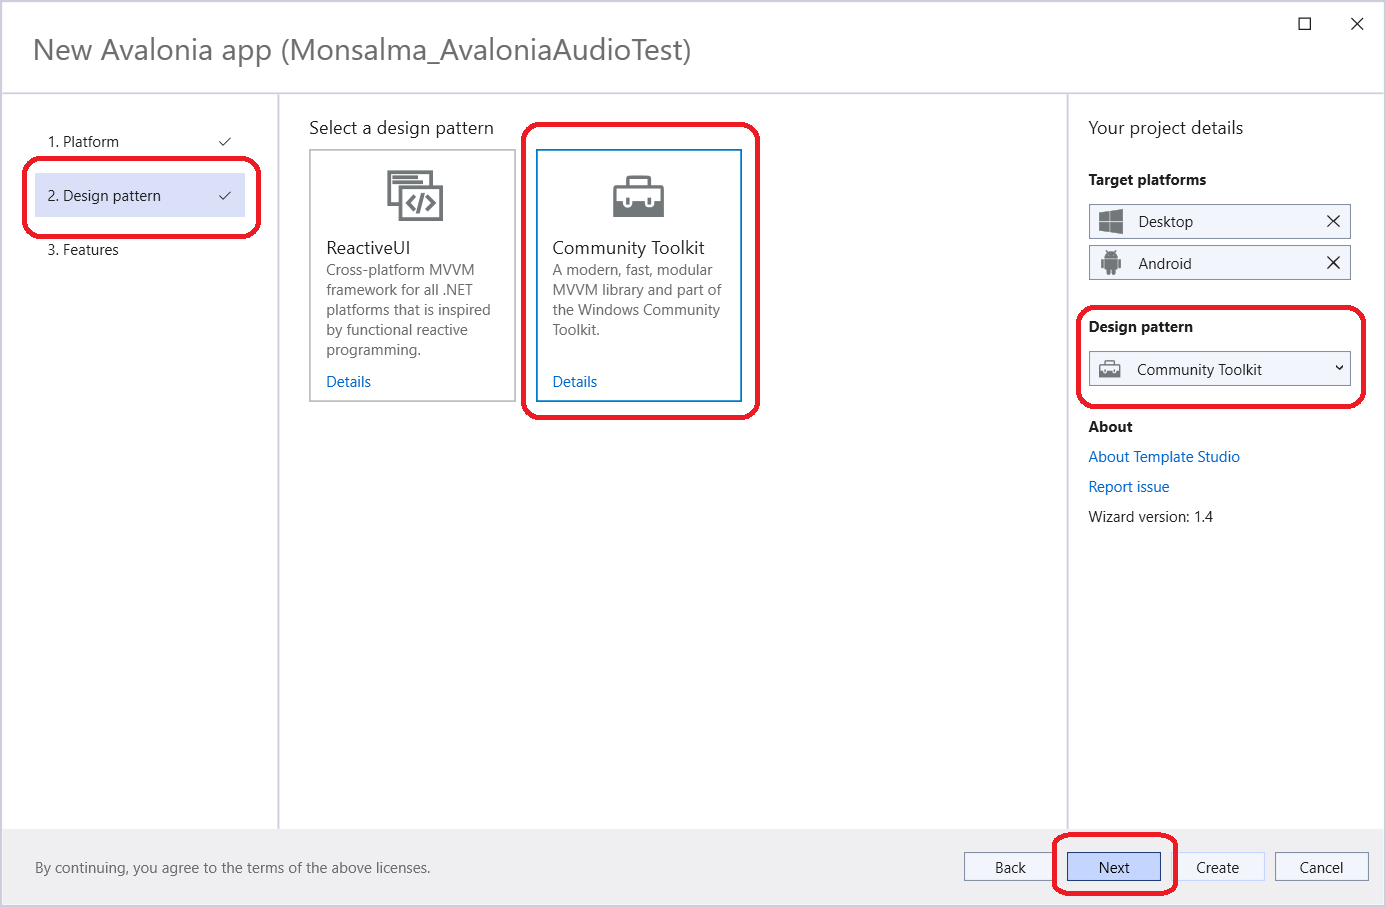
Step 5 – Avalonia project configuration 2/3 – Design pattern
As I stated earlier, this demo is not about MVVM design. I chose Community Toolkit because I’m used to it. We will not use view model so feel free to chose a pattern per your liking and hit Next:
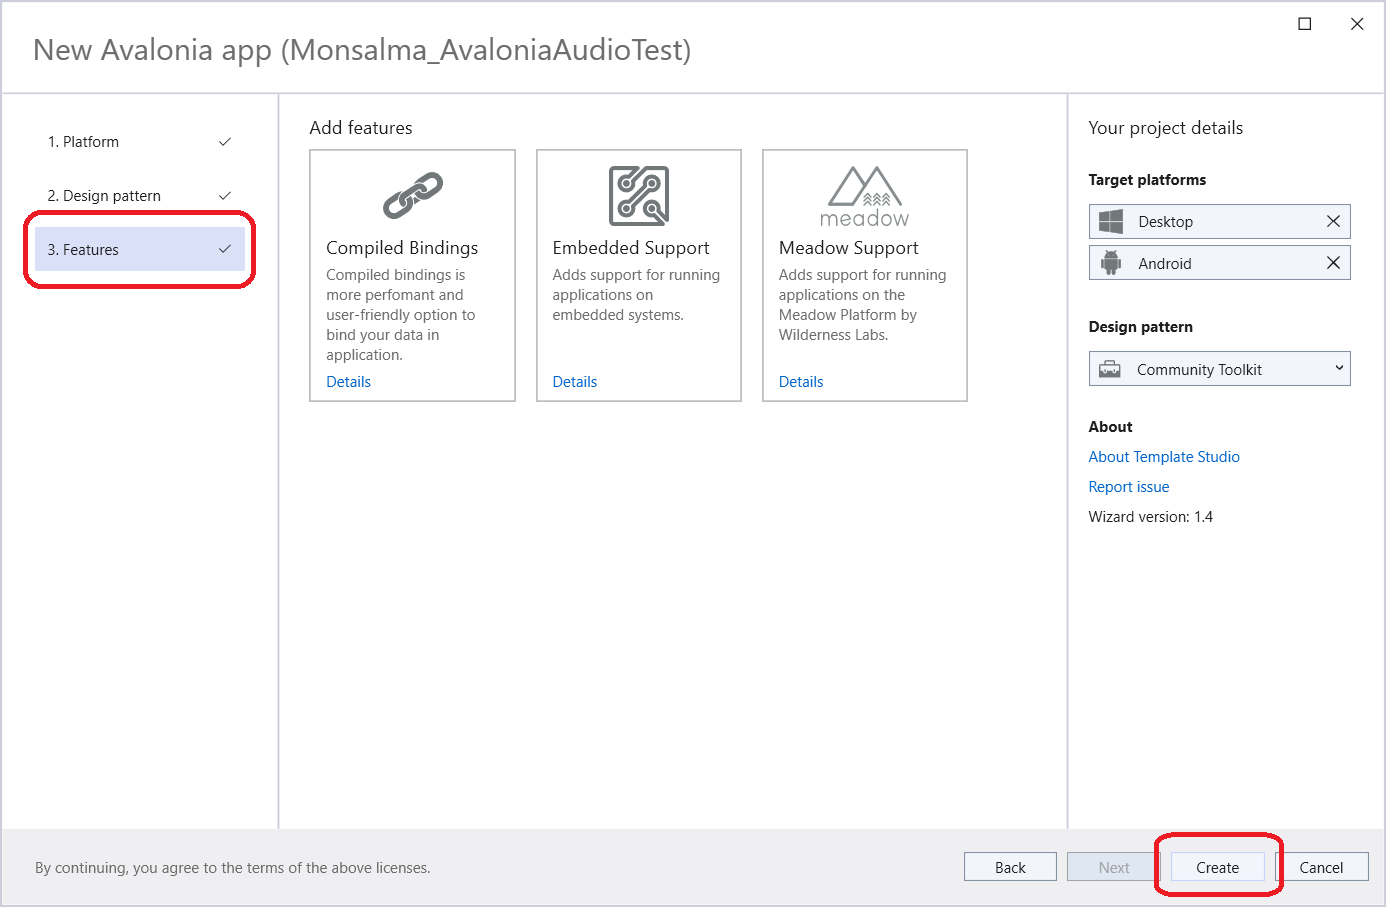
Step 6 – Avalonia project configuration 3/3 – Features
We will not be using any of these (Compiled Bindings, Embedded Support, Meadow Support). I definitely recommend using compiled bindings for non-trivial projects. For now, just hit the Create button and that will finish the project creation phase:
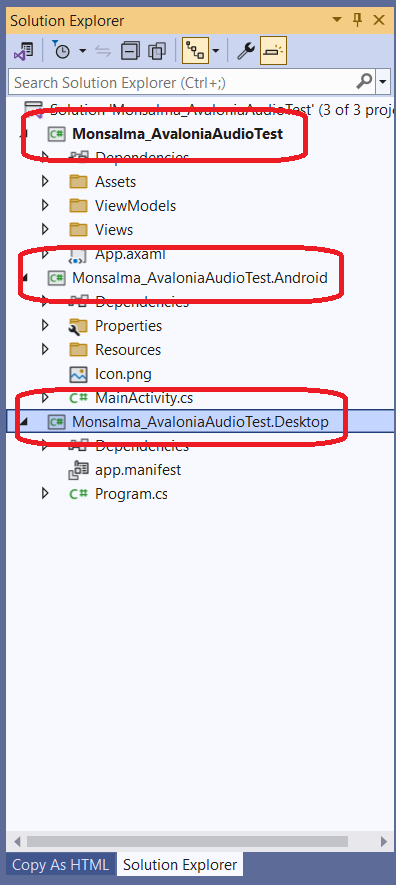
At this point, you should see 3 projects within the solution:
- Monsalma_AvaloniaAudioTest is the main project where all of our code will go. Its output type is Class Library and it cannot be executed. It comes with Avalonia and CommunityToolkit.Mvvm NuGet packages installed.
- Monsalma_AvaloniaAudioTest.Android is Android specific project. We will not write any Android specific code in this demo, but we will execute the project and test it in an Android simulator. Avalonia.Android NuGet package should be installed by default.
- Monsalma_AvaloniaAudioTest.Desktop is the Windows counterpart. We will only execute it to verify that everything works as expected under Windows operating system. Avalonia.Desktop NuGet package should be preinstalled.
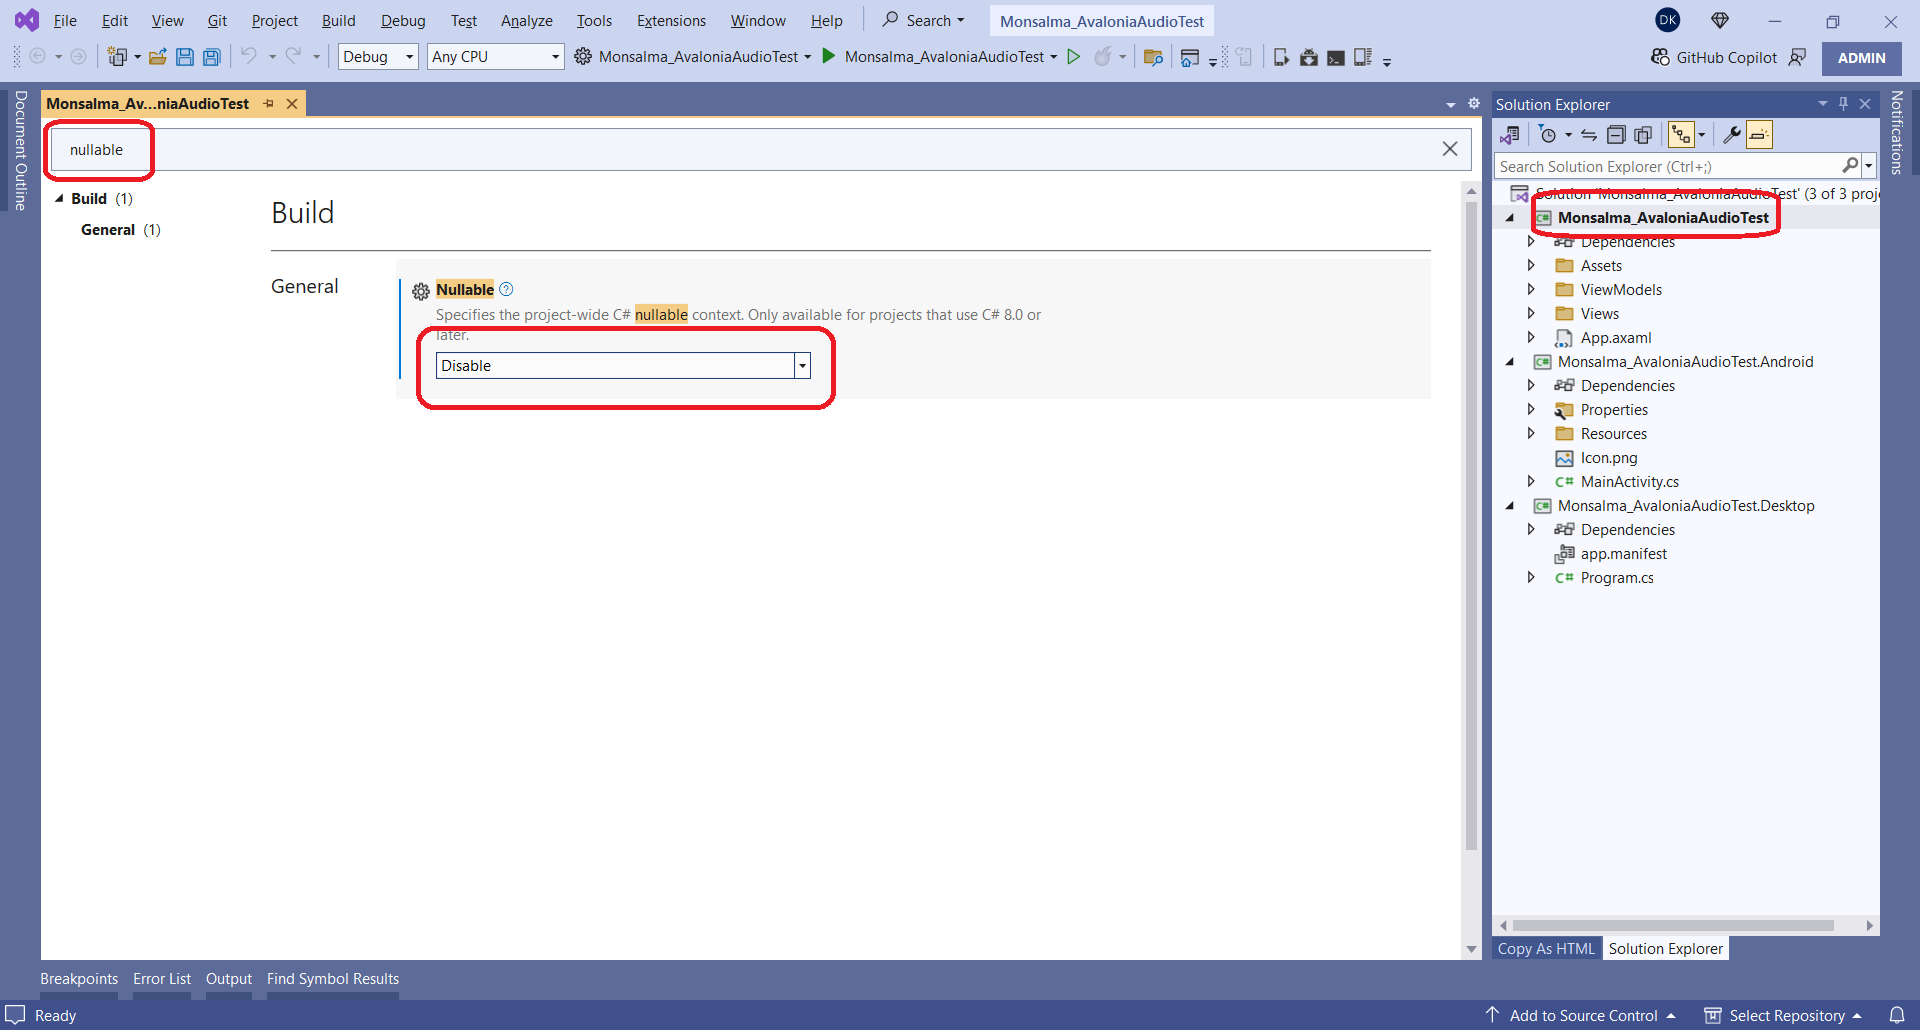
Step 7 – Modify C# nullable context
For all 3 projects, let’s set the Nullable setting to “Disable”. This is just something I like to do. We need to access project properties by right-clicking the project and selecting Properties. Then we need to locate the setting either by scrolling down or by using the search feature.
Step 8 – Modify the default Avalonia UI greeting
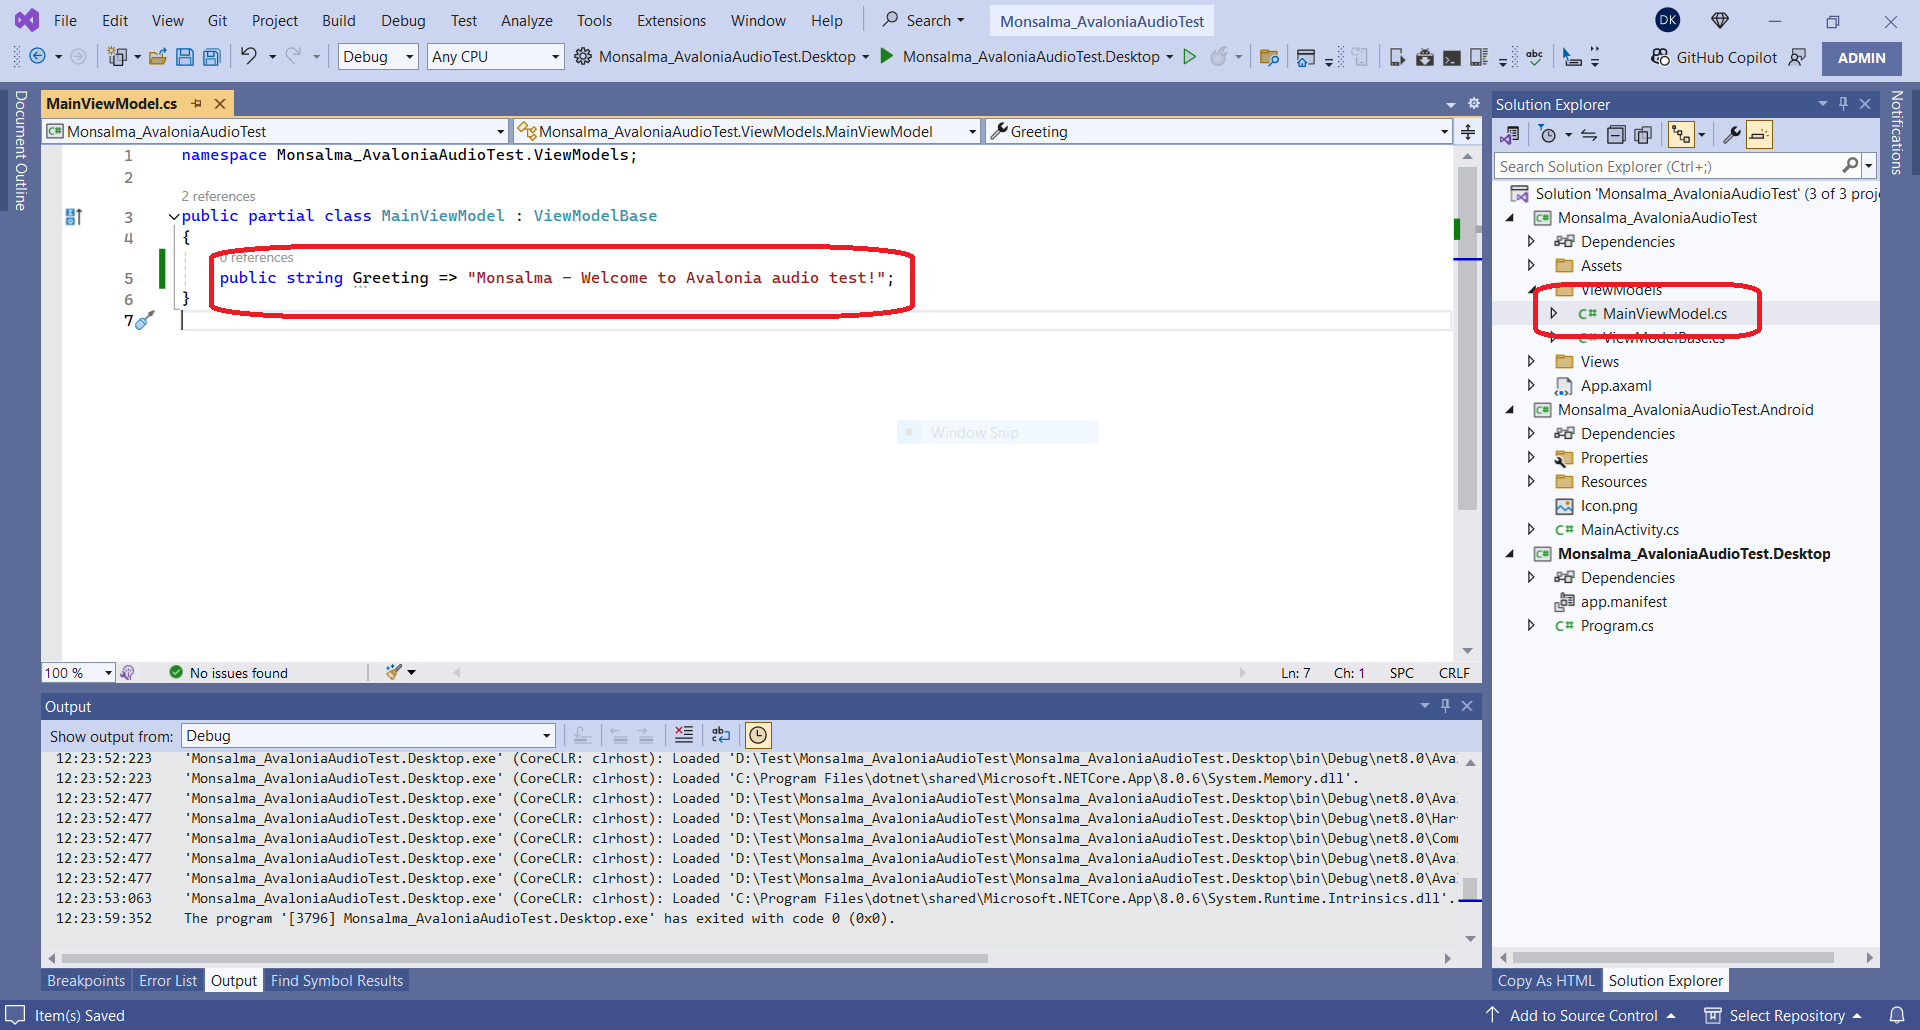
This is the most important part of the demo 🙂 Let’s locate and open MainViewModel.cs under the ViewModels folder, and modify the Greeting value:
Step 9 – Change main window size
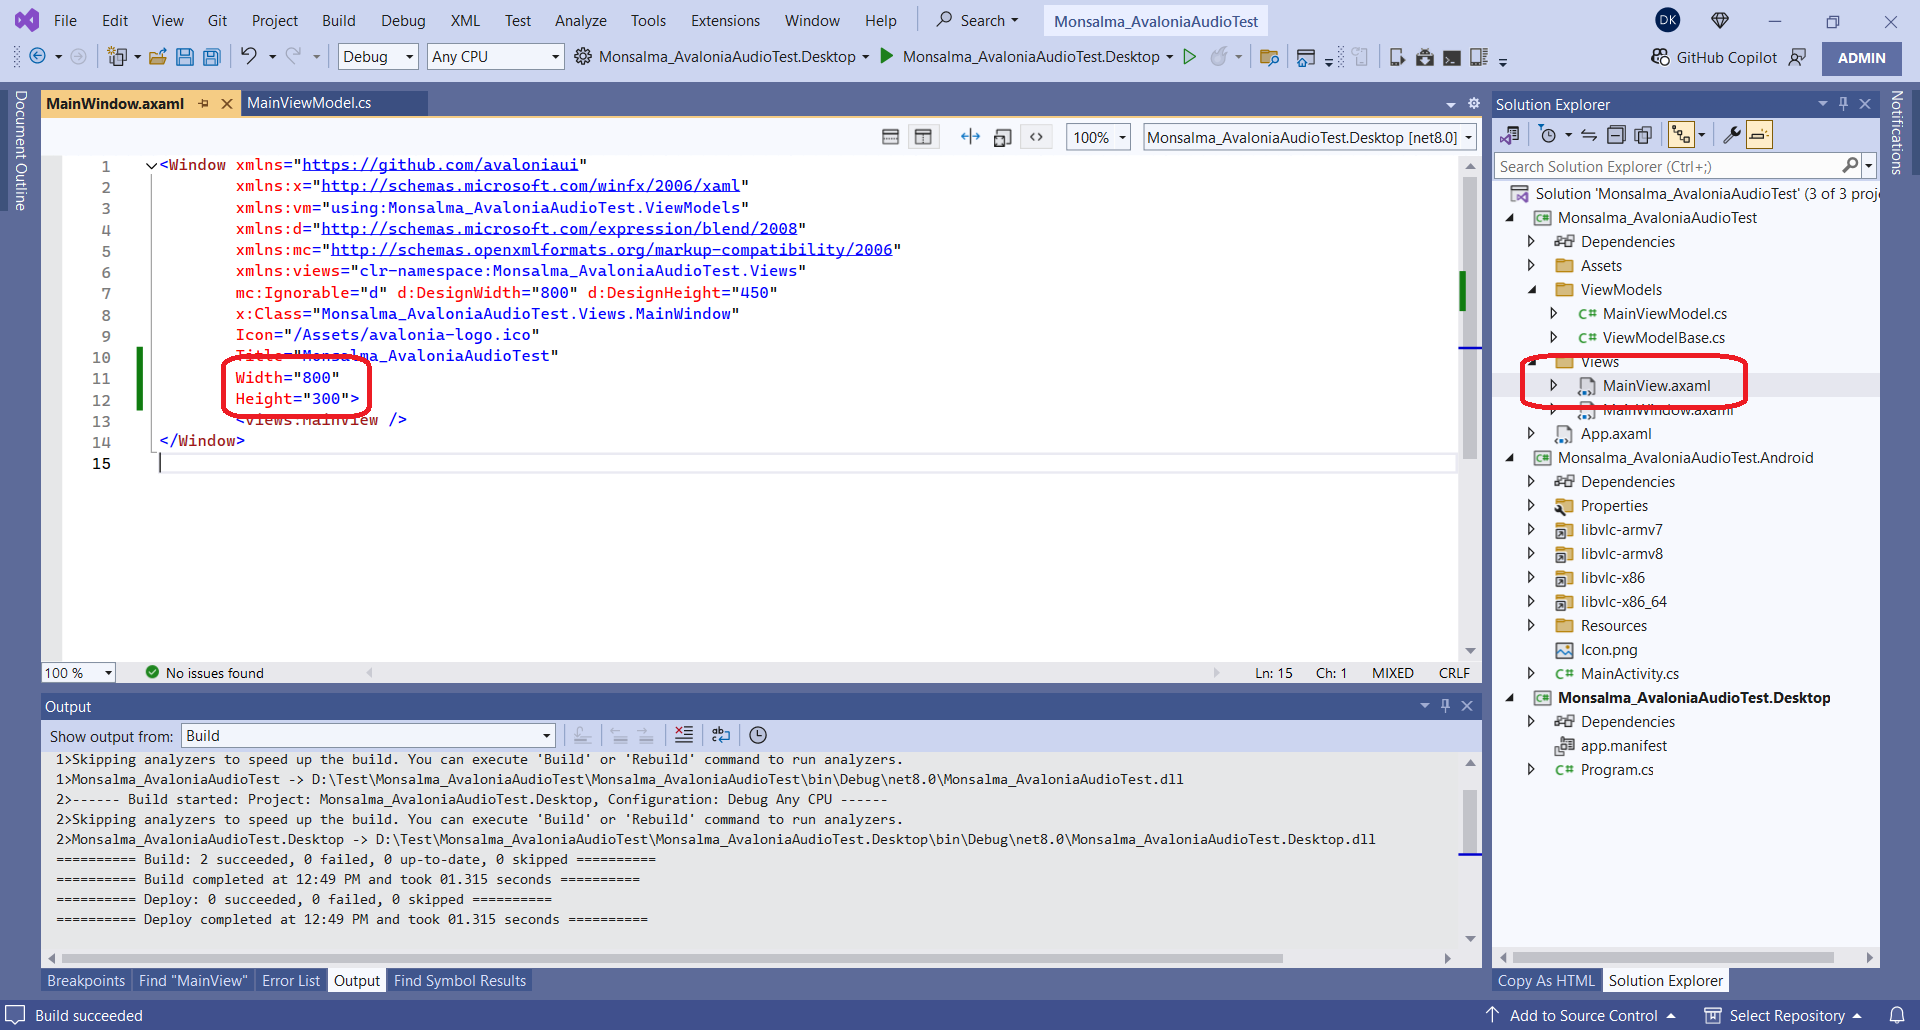
Let’s locate and open MainView.xaml, which should be under the Views folder. We need to specify Width and Height. Of course, this will only be applied when running on Windows. On Android, the window size will depend on the device itself.
Step 10 – Run the app
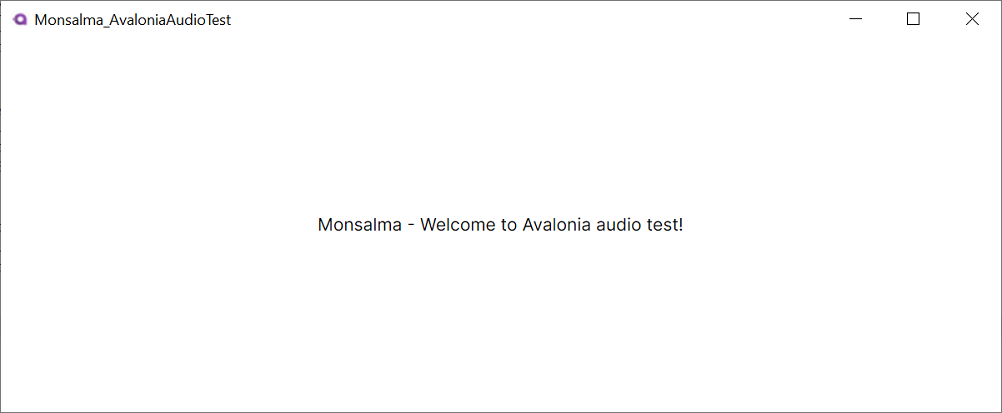
At this point we still haven’t added any audio related source code, but let’s try to build the solution and execute the Windows Desktop project (you can execute the Android one if that’s what you prefer). When building, you should get 0 errors. The main application window should look like this:
Step 11 – Install LibVLCSharp package
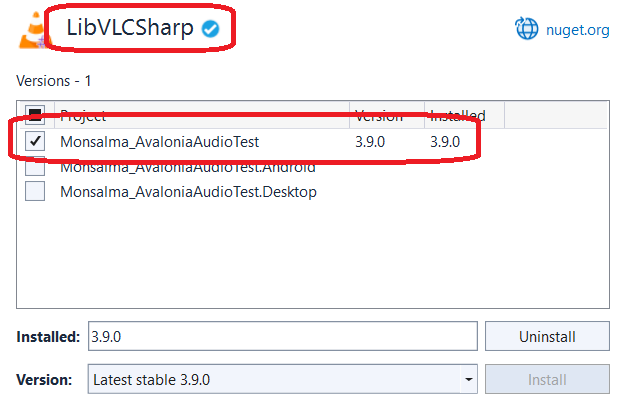
Now that we’ve verified that we can build and run our application, it’s time to install some NuGet packages. We should first install LibVLCSharp, but only in the main project. We don’t need the package in platform specific projects. After installing the package, NuGet Package Manager should show this:
Step 12 – Install VideoLAN.LibVLC.Android package
Next, we need to add VideoLAN.LibVLC.Android package, and only to the Android project:
Step 13 – Install VideoLAN.LibVLC.Windows package
Similarly, we need to add VideoLAN.LibVLC.Windows package to the Windows Desktop project:
Step 14 – The source code (code behind)
Finally we came to the interesting part – writing the source code! In this section, we’ll focus on the code behind and in the next, we’ll deal with XAML.
Defining main LibVLCSharp objects
private LibVLC MainLibVLC { get; set; }
private MediaPlayer MainMediaPlayer { get; set; }
MainLibVLC is the reference to an object of the LibVLC class, which is the core class within LibVLCSharp package.
We define MainMediaPlayer (MediaPlayer class), which will help us to initiate the playback and track playback progress.
Initializing main LibVLCSharp objects
private void InitMediaPlayer()
{
	MainLibVLC = new(enableDebugLogs: true);

	MainMediaPlayer = new(MainLibVLC);
	MainMediaPlayer.TimeChanged += MediaPlayer_TimeChanged;
}
We simply initialize MainLibVLC and then we use it to initialize MainMediaPlayer.
At this point we register handler for the TimeChanged event. We’ll use it to track playback progress.
Defining TimeChanged handler
private void MediaPlayer_TimeChanged(object sender, MediaPlayerTimeChangedEventArgs e)
{
	Dispatcher.UIThread.Invoke(
		new Action(
			() =>
			{
				PlaybackStatus.Text = $"{MainMediaPlayer.Time / 1000.0} / {MainMediaPlayer.Length / 1000.0}";
			}
		)
	);
}
Within the handler, we’re simply using the TextBlock (defined with x:Name in XAML) element to display the current position (MainMediaPlayer.Time) and total media duration (MainMediaPlayer.Length). Both values are in milliseconds, so we’re converting them to seconds.
Since this method updates UI elements, we need to execute it under the UI thread. We use Dispatcher.UIThread.Invoke for that. Without this bit of code, we would get an exception.
Defining the button clicked (Click) handler
public void ClickHandler(object sender, RoutedEventArgs args)
{
	Media media = new(MainLibVLC, new Uri(MediaURI.Text));
	MainMediaPlayer.Media = media;
	MainMediaPlayer.Play();
}
We create the Media object using MainLibVLC and the text from our TextBox control (defined with x:Name in XAML).
Then we link the newly created Media object and MainMediaPlayer.
Finally, we play the media!
Code behind – The complete source code
using Avalonia.Controls;
using Avalonia.Interactivity;
using Avalonia.Threading;
using LibVLCSharp.Shared;
using System;

namespace Monsalma_AvaloniaAudioTest.Views;

public partial class MainView : UserControl
{
    private LibVLC MainLibVLC { get; set; }
    private MediaPlayer MainMediaPlayer { get; set; }

    public MainView()
    {
        InitializeComponent();
        InitMediaPlayer();
    }

    private void InitMediaPlayer()
    {
        MainLibVLC = new(enableDebugLogs: true);

        MainMediaPlayer = new(MainLibVLC);
        MainMediaPlayer.TimeChanged += MediaPlayer_TimeChanged;
    }

    public void ClickHandler(object sender, RoutedEventArgs args)
    {
        Media media = new(MainLibVLC, new Uri(MediaURI.Text));
        MainMediaPlayer.Media = media;
        MainMediaPlayer.Play();
    }

    private void MediaPlayer_TimeChanged(object sender, MediaPlayerTimeChangedEventArgs e)
    {
        Dispatcher.UIThread.Invoke(
            new Action(
                () =>
                {
                    PlaybackStatus.Text = $"{MainMediaPlayer.Time / 1000.0} / {MainMediaPlayer.Length / 1000.0}";
                }
            )
        );
    }
}
Step 15 – The source code (XAML)
We’ll use vertical StackPanel to stack:
TextBlockwhich displays the greetingTextBoxfor displaying/entering media URI. Note thex:Namepart. That’s how we reference the control in code behind.Buttonfor starting the playback. Note theClickpart, used to define a handler (in code behind) for the click event.TextBlockwhich displays playback status and media duration. Here we again usex:Nameto link XAML and code behind.
<StackPanel
		Orientation="Vertical"
		HorizontalAlignment="Center"
		VerticalAlignment="Center">

		<TextBlock
			Text="{Binding Greeting}"
			HorizontalAlignment="Center"
			VerticalAlignment="Center" />

		<TextBox
			x:Name="MediaURI"
			Text="https://github.com/rafaelreis-hotmart/Audio-Sample-files/raw/refs/heads/master/sample.mp3"
			HorizontalAlignment="Center"
			VerticalAlignment="Center" />

		<Button
			Content="Play"
			HorizontalAlignment="Center"
			VerticalAlignment="Center"
			Click="ClickHandler" />

		<TextBlock
			x:Name="PlaybackStatus"
			HorizontalAlignment="Center"
			VerticalAlignment="Center"
			Text="-" />

	</StackPanel>
XAML – The complete source code
<UserControl xmlns="https://github.com/avaloniaui"
             xmlns:x="http://schemas.microsoft.com/winfx/2006/xaml"
             xmlns:d="http://schemas.microsoft.com/expression/blend/2008"
             xmlns:mc="http://schemas.openxmlformats.org/markup-compatibility/2006"
             xmlns:vm="clr-namespace:Monsalma_AvaloniaAudioTest.ViewModels"
             mc:Ignorable="d" d:DesignWidth="800" d:DesignHeight="450"
             x:Class="Monsalma_AvaloniaAudioTest.Views.MainView"
             x:DataType="vm:MainViewModel">
	<Design.DataContext>
		<!-- This only sets the DataContext for the previewer in an IDE,
         to set the actual DataContext for runtime, set the DataContext property in code (look at App.axaml.cs) -->
		<vm:MainViewModel />
	</Design.DataContext>

	<StackPanel
		Orientation="Vertical"
		HorizontalAlignment="Center"
		VerticalAlignment="Center">

		<TextBlock
			Text="{Binding Greeting}"
			HorizontalAlignment="Center"
			VerticalAlignment="Center" />

		<TextBox
			x:Name="MediaURI"
			Text="https://github.com/rafaelreis-hotmart/Audio-Sample-files/raw/refs/heads/master/sample.mp3"
			HorizontalAlignment="Center"
			VerticalAlignment="Center" />

		<Button
			Content="Play"
			HorizontalAlignment="Center"
			VerticalAlignment="Center"
			Click="ClickHandler" />

		<TextBlock
			x:Name="PlaybackStatus"
			HorizontalAlignment="Center"
			VerticalAlignment="Center"
			Text="-" />

	</StackPanel>
</UserControl>
Step 16 – Run the app on Windows
At last – time to play some audio! Hit that Play button and enjoy that favorite song of yours!
Step 17 – Run the app on Android
I used Google Pixel 3 XL – API 30 Android simulator. This is the result:
Conclusion
In this demo we used Avalonia UI framework and LibVLCSharp library to play an URI based media.
We went step by step from creating and configuring our project and adding LibVLCSharp NuGet packages, to writing our source code in code behind and XAML.
We took a glance at LibVLC, MediaPlayer and Media classes. I hope this demo will serve as a good starting point for delving deeper into the Avalonia UI and LibVLCSharp magic.
For more info on how to play video in Avalonia UI, please visit the related post – How to play video in Avalonia UI.

Leave a Reply